Showing posts with label Tutorials n Crafts. Show all posts
Showing posts with label Tutorials n Crafts. Show all posts
Posted by
linda
comments (0)

We had done this several years ago for Corbyn's first birthday and now he is six, we some how managed to lose some of the blocks.
As we had access to lots of trees on our property I was keen to do this project again before we moved. In fact we did on our second last day of being in Tassie.


First select some branches to use of various widths and lengths to use.
Then randomly,well that is our method, you can measure and mark if you want, cut the branches with a drop saw.
Of course you can use a hand saw but you don't get as even a cut or as smooth a finish in my opinion. If a handsaw is all you have (as we did for a few of ours initially the first time we attempted this) then use what you have.
Please note: Saxon did use safety glasses for the cutting with the drop saw but took them off for this posed photo!!


Dare I admit that we actually nave never done this as we love the rough look and the drop saw as I said does give a lovely finish anyway But for anyone who is a purist you then sand and then polish with beeswax polish for a completed look.
Our children have had hours of play time with these blocks and you can often see them in my blog posts with the children's creativity.
In fact here is one from last night that Rogan made of various structures from Lord of the Rings:

Blessings to you and your homes,

Posted by
linda
comments (0)

With our dear Daddy away I really wanted to have a stricter routine of meals and clean up as well as bedtime routines for the children (and me) so I reverted to a policy that we have had before in our home of NO DVDs (which is our only TV viewing) during the week at all.
We have had this policy before and it gradually erodes as we start to watch a little here and there and then find we are watching it a little each day.
I admit that especially with Stephen away it can be a temptation for a ' five minutes piece' to send children to watch the TV.
However I do know that our children are far more creative in their play as well as what they do with their time when we eliminate or reduce the screen time.

When I got them out again though I was quite disappointed that my original templates had been lost, these were hand drawn by me years ago.

What do you need for this project?
I always use manila folders for the body of the doll
You also need some cardboard in various colours. You can use folder dividers or large coloured cardboard sheets.
Standard $1 wrapping paper from the cheap shop
coloured paper
Gel pens
crayons
Scissors
Glue

It is best if you cut out all your pattern pieces first then you can then use the pieces for the coloured paper you want.
First you need to cut out the body and a hair pattern.
Then you glue the hair on to the back of the head


Measure the length of the dress you wan ton your doll form the shoulder an then double over using the folded part as your shoulder seam.
Then cut a small hole for the head to slip through..
Cut curves or other patterns for the dress as well as a waist line


I hope you have enjoyed this little arty, crafty tutorial. We are planning on having quite a few paper craft sessions over the next week.
Blessings to you and your homes,
Posted by
linda
comments (0)

I had hoped to have it ready for Autumn's birthday but sadly that did not happen.
It actually started with me wanting to make a new item for our birthday table and grew from there.


Myffwyn insisted on helping me with this and I had some ideas on how I wanted it but she took over on the cake especially, so it could be considered her creation. I think she has a gift in this area like her sister Eden. Did you see the photo at the start of Eden's birthday post? She made these just for fun too.I really enjoyed making these with her and look forward to more creating with Myffy soon.
However Vellvin said our fairy was lonely and needs a friend like the fairy in the Shirley Barber books, and so next up will be a teddy friend for her to have a picnic with.
Perhaps this is going to be a project that grow and grow!
Does anyone else have those sort of projects too?
I am considering this as one of the projects to put in the Etsy shop we keep thinking of starting. What do you think?
I am hoping to write a tutorial on how I made these soon too
BTW, does anyone else keep having trouble with some of the text coming up with a white background, for no apparent reason lately in your blog posts?
Blessings to you and your homes,
Posted by
linda
comments (0)

A day when I was busy and things did not seem to be going right.
A day when I was not focused on our children even though I was right there with them. I was caught up in the 'to do ' things.
And then I simply thought we needed to go outside and play and walk together.
So simple! So easy! So wonderful!
Already I was refreshed and and looking for fun with our children.
It was a windy day and Myffwyn brought out a piece of wool on a stick and was running with it, enjoying the wind, savoring the joy to be held and I was inspired to be part of it and asked if they wanted me to make Wind Ribbons for them all.
I just hoped I had some crepe paper to do this as I planned......
but alas I did not.
However we had some left over ribbon bunting from St Patrick's day years ago and so I used that and some sticky tape.

Then I placed sticky tape at a point further down to create a handle so to speak and then simply tore up the ribbon in long strips to create the 'swirly' parts. I guess the bunting it is like that ribbon you wrap presents in that you curl up with scissors, I really don't know what it is actually called. I bought it at our local 'cheap store.'


But, boy oh boy, was I thankful that I took this time to be with our little ones and share in the joy that they had together, outside in the wild and windy weather.
By the way, if you are interested, we all came back in much happier and hopeful souls!!
Blessings to you and your homes
,
Posted by
linda
comments (0)

Of course when I looked at what we had in the craft cupboard I did not have any of the items I needed, sigh!
So after a quick trip to a couple of stores in town I managed to get some items to work with. You have to believe me when I say I was not able to get exactly what I wanted, something I am actually used to by now.
Mind you I think I am pleased with the way it turned out though.
So what do you need:
glittery pipe cleaners
simple clear tinted beads.
scissors to cut the pipe-cleaner with
optional pliers

Take a pipe-cleaner and cut in half and then half again.
Twist into a star shape


Add some thread and hang up

Happy Beading!!
Blessings to you and your homes,
Posted by
linda
comments (0)

I wasn't sure what I would do except it had to be hands on and quick and simple to do.
This is what I came up with~
Now you don't need to use that beautiful hand dyed wool felt for this craft, you can use the synthetic stuff from Spotlight of a cheap craft store.
I simple free hand drew two red heart shapes and the bits and pieces for each of the two hearts.
Of course you can make these as large of small as you like, and like I said, you don't need to measure just free hand cut as you go.

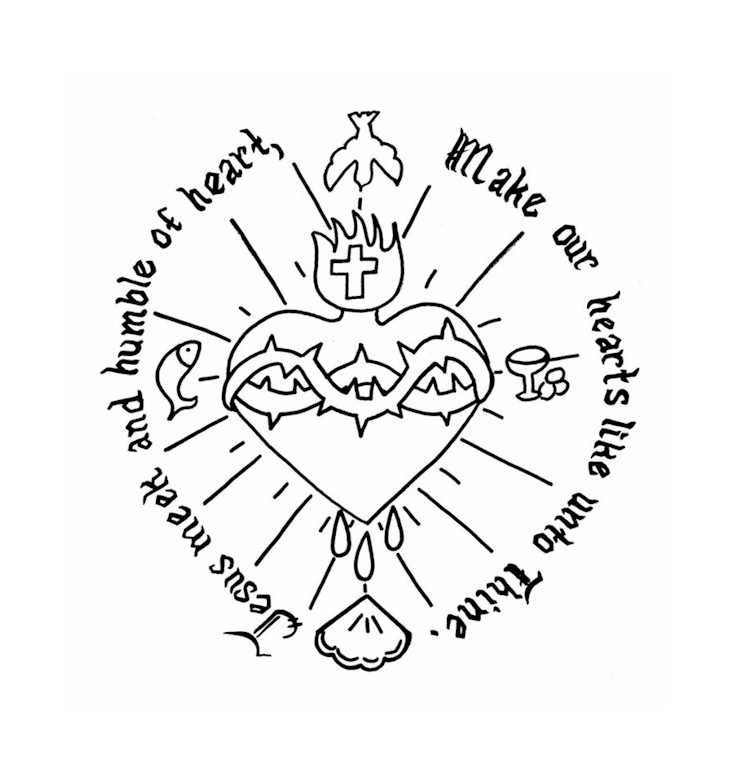
For the Sacred Heart of Jesus:
A large red heart
I cut a cross from brown felt.
Orange fire shape
From a different colour brown I cut little 'stick like' rectangles that could be put together to make the crown of thorns
A few drops of blood from the red felt again
For the Immaculate Heart of Mary:
A Large Red heart
Orange fire shape
The sword was the most difficult (not really it is very simple). I cut the blade part from grey felt and then the handle part form brown, over lapping the grey bald part a little. Then I did a very small running stitch to join them with brown thread.
Pink roses- first I cut a circle and then just cut little parts out to make the
Tiny little green leap shapes.

We really liked this colouring page as well as This colouring page. Also this was another I found on line too.
We didn't do this activity page but it is a really good page for older kids
I also made word search for the children from this site using key words from both the devotions.
I also wanted to be able to talk about the symbolic meaning of the images and what each part of the image means.
This was actually a bit harder for me as I have never actually thought about it in such detail (naughty me).
This was what I was able to find out: in relation to these particular images
Sacred Heart of Jesus:

Hearts represent love and life. Jesus’ heart beats with the fire of love (at the top of the heart) which was demonstrated at the cross. The fire also represents the purifying fire of God by which he purifies men. It exudes the transformative power of divine love.The crown of thorns brought suffering which was endured for the love of man to redeem him — to bear man’s pain in his own heart. The cut in the heart is that made by the lance that was thrust through his heart when he was on the cross.
The blood dripping represents the new life secured through his death (life came through dead). The result is the heart of man (below surrounded by flowers) is given new life. The flowers represent a garden of delights, new life, freshness. The Garden of Eden which brought about death by sin is now replaced by the Garden of Heaven which brings new life because of holiness.
Adam and Eve experienced death at the Tree of Life in the Garden of Eden; The New Adam (Jesus) brings about life at the Tree of Death (the cross) in another garden. This cross is at the top of the heart. Heaven is represented by the clouds and the blazing sun or heavenly light from God behind the hearts.
Immaculate Heart of Mary:

This one is similar to the Sacred Heart. The roses surrounding Mary’s heart represent her sinlessness and purity, sweetness and new life. The seven swords piercing the top of the heart represents the “Seven Sorrows of Mary,” (“Mater Dolorosa”). The first of her sorrows was the Prophecy
of Simeon that a sword would pierce her soul because of her son’s death Luke 2:35), 2) their flight into Egypt, 3) the loss of Jesus in the Temple; 4) the fourth sorrow is Mary watching Jesus carry the cross, 5) the crucifixion imagining a mother watching her son die this way; 6) receiving his limp, cold body after the crucifixion, 7) the body of her son buried in the tomb.
When Mary and Joseph took Jesus to the temple as a baby the prophet Simeon said that the life and death of Jesus would be like a sword that would pierce her soul (Luke 2:35). The lower heart, the one of Mary surrounded by roses, shows a cut in it which is symbolic of her sorrows. But her sorrows have brought us new life and pure hearts represented by the garden of roses below.


I actually think this is good for the children as it gets them to think of how the image is put together.


Blessings to you and your homes,


