
The idea seemed to me to represent all those aspects of home making that I enjoy.
The beauty and love of Hearth and Home. The desire to feed our family both physically and emotionally by creating that warm atmosphere in the kitchen which is to me, the heart of any home.
I guess it all began when I was talking to a friend and how she mentioned that they were renting their home out and how it had a wood fired cooking stove.
I remember saying 'isn't that hard to cook on?' and her response was one that delighted and intrigued me for many years to come.

The reason for this was I have know other people since my first introduction to wood stoves who have both and they tend to only use the wood stove in the colder months. I did not want this to happen to me
If I had a wood stove I wanted to use it all the time and rather than fall into the temptation of using the 'back up one we simply did not install one........and this ha been a decision I have never regretted!!

I admit even though I loved the cooking capacity of the stove I still loved the look of that Aga. So the way around this was to have my dear husband and older sons to make a beautiful surround around the stove complete with mantle over the stove and light in under the stove top.
They also built a wood box to one side that looks just like a cupboard and I have marble tops on the sides.
These we picked up for $50 each as odds

In regards to actual cooking capacity I have been able to put three trays of food on both sides of the ovens and then underneath there is a warming oven or very slow cooking oven that also has two selves.
I can't tell you how much I have loved this space, especially at times when we have huge 'cook ups' like when we are doing Christmas, Easter or birthday cooking

On the other side of the stove I have a post and pans shelf that has, well most of the most used pots for everyday use.
Once again the space beside the stove allows for many things to be placed on top.

The kettle can be boiled and then placed on the side simmer plates to keep warm all day so it is a very easy step to put the kettle on for a 'cuppa'
Cooking on a wood stove is so very, very easy. I guess it is a matter of getting used to it, but I hardly ever check the temperature gauges and cook mostly by how the fire looks and how long the fire has been hot for etc.
Our older girls have pretty much learnt to cook using this oven and they can not imagine cooking on anything else, nor can I for that matter as I really love it.
It is a complete picture of cooking and providing warmth for your family in so may ways, including having people stand in front of it to keep warm while chatting to you as you do the cooking.
If I was building a kitchen again I would make this stove a priority again.
There is nothing so beautiful tasting as a Christmas Cake that has been cooked in a wood fired oven over a long period of time.
Or baked lamb and apple crumble or gingerbread cookies or muffins or scones or............
How I have loved it BUT stay tuned for more interesting news in my next post - The Times they are a-Changin' ........
Blessings to you and your homes,

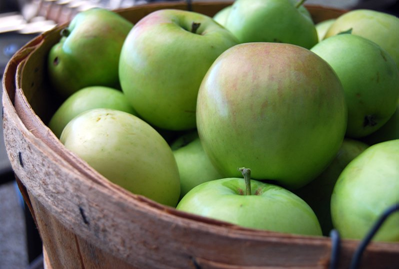
It’s become an annual tradition… truckin’ to the mountains of North Carolina to apple pick with friends. This year we went back to Justus Orchard- it’s family-run and lots of fun.

the gang minus the boys
Each year we have a serious and competitive contest for “Best Apple”. This time, our son Gavin took first place. Makes a Mama proud. ;)

So what do you do with bushels of apples and not a whole lot of time or motivation? Cook up some Lazy Man’s Applesauce! I call it lazy since there’s no tedious peeling involved. Which makes it more nutrient rich too (I like to use that excuse):

Cinnamon Applesauce
(Slightly adapted from allrecipes.com)
2 lbs of apples of your choice
1.25 cups of water
1 cinnamon stick
1/2 lemon
1. Core and roughly chop apples (I left skin intact for a boost of nutrition)
2. In a medium pot, add apples, water, juice of 1/2 lemon, and cinnamon stick.
3. Cover and bring to a boil.
4. When boiling, turn down to a simmer and partially cover. Let simmer for 25-30 minutes, or until apples are soft and begin to break apart.
5. Remove from heat completely, and allow to cool.
6. Remove cinnamon stick. In a blender or food processor, blend apple mixture.
7. Top with additional cinnamon (optional)
Makes about 4 cups.
Recipe and photo found at Tori Takes a Bite.
I freeze my applesauce in gallon sized Ziplock bags. Easier than canning. Just make sure they are Ziplock brand. I ruined a ton of applesauce last year using cheapo bags… they all opened up and created an applesauce skating rink in my freezer.
Sorry it’s been more recipes than decorating here lately. But the décor side of my life is slow going at the moment for obvious reasons. Rest assured, in a few months there should be lots of material!
 image here
There’s a chill in the air and the evenings are getting shorter. We’re breaking out the sweaters and socks and having bonfires over here in Mr. Roger’s neighborhood. Two in one weekend! Conversation with friends, hot chocolate and s’mores… marking the change of seasons. There’s nothing like it!
I’d like to share my favorite chili recipe… perfect for fall! Every time I make this, I get rave reviews. And like every other recipe I post on my blog, it’s easy too. With almost 1300 five star reviews on Allrecipes.com, you know it’s gotta’ be good! Using Verde salsa is key to this recipe.

Our favorite brand of salsa is Pepper Dog Salsa, you can find out where to buy it here.
Ingredients
- 2 pounds ground beef
- 1/2 onion, chopped
- 1 teaspoon ground black pepper
- 1/2 teaspoon garlic salt
- 2 1/2 cups tomato sauce
- 1 (8 ounce) jar salsa
- 4 tablespoons chili seasoning mix
- 1 (15 ounce) can light red kidney beans
- 1 (15 ounce) can dark red kidney beans
Directions
- In a large saucepan over medium heat, combine the ground beef and the onion and saute for 10 minutes, or until meat is browned and onion is tender. Drain grease, if desired.
- Add the ground black pepper, garlic salt, tomato sauce, salsa, chili seasoning mix and kidney beans. Mix well, reduce heat to low and simmer for at least an hour.
Another weekend treat was seeing the movie Courageous in the theater with our boys. I know people’s opinions of movies are so subjective, and because of that I don’t usually recommend any.

But this one is different. If you have a man in your life…whether it be an older son, a father, a brother, a husband, a co-worker, or a friend… please bring them to see this movie. It’s the type of movie that will affect everyone in one way or another. It very well could be life-changing. Go see it!

Of course you are and here it is for you, but watch out it won't last very long at all, well not in our home at least.
Ingredients ~
1 packet of plain cake mix
1 cup dessicated coconut
125grams of melted butter
400g can of apple
300 grams of sour cream
cinnamon and sugar to taste
Method~
1. Combine cake mix, butter and coconut in a bowl. Mix.
2. Press mixture into lined/ greased lamington pan. Cook for 15 mins at 180 degrees c or till lightly browned.
3. Cool slightly
4. Spread apple evenly over base sprinkle with sugar to taste
5. Then spread sour cream over top of apple and sprinkle with cinnamon and more sugar if desired.
6. Cook for a further 20 mins or until sour cream has set.
7.Cool in pan and then cut into fingers and serve.
I hope you enjoy it as much as we do ♥
Blessings to you and your homes,
I’ve worked around my defect by choosing recipes from this site. I look for ones that have hundreds of 5 star reviews because I figure if that many people in the world wide web like it, then it’s bound to please everyone here.
My children like to experiment in the kitchen, and I fully intend on working myself out of a job in the cooking department. Until that glorious day arrives, Mom’s in charge which means simple meals most of the time.
And one of our favorites that we have almost every week is Roast Sticky Chicken. Recipe and photo found here.

This chicken is mouth watering. Everyone loves it. We cook two whole chickens. The first day we serve it with mashed potatoes.
And the second day, we serve the shredded chicken over this:

Yes, that's a package. I told you I’ll never have a cooking blog. But if you could only taste this Trader Joe’s frozen concoction of yumminess, you would see that convenience food sometimes has its place. And in our case, every week. The whole family loves this meal.
Along with our weekly chicken dishes and almost all our other dinners for that matter, we serve up our side of veggies via a fresh salad. Usually Romaine with our favorite homemade dressing we got from here.
1/4 cup balsamic vinegar
1/4 olive oil
1/4 cup pure maple syrup, agave or honey
1 tsp. dijon mustard
Simply good. (and easy)

I’m so thankful for friends who are willing to share their harvest…

and their canning know-how.

To my delightful surprise, I learned how simple pickling can be…

and how much tastier than store bought. It makes them worth the effort. Really!
Friend’s Sweet Pickle Recipe:
4 quarts cucumbers, sliced
1.5 cups onions, chopped
1/3 cup salt
3.5 cups pure evaporated cane sugar
1.5 tea. tumeric
1.5 tea. celery seed
2 T mustard seed
3 cups apple cider vinegar
Combine cucumbers and onions (mix well). Pour salt on top plus enough ice cubes to cover the top. Let stand 3 hours. Then rinse thoroughly.
In a large pot, combine sugar, spices, and vinegar. Add cucumber and onions. Bring to a boil for 5 minutes.
Place pickle mixture in clean (hot) quart jars and seal with lids. Place jars in boiling water to cover. Boil 10 minutes. Remove with long tongs and let cool.


